Vertex Vx351 Programming Software Work Fix May 2026
Mastering the Vertex VX-351: A Comprehensive Guide to Programming Software and How It Works
For professionals in security, construction, event management, and industrial logistics, the Vertex Standard VX-351 remains a gold standard for reliable, rugged VHF/UHF two-way radio communication. However, owning a fleet of these powerful devices is only half the battle. The true potential of the VX-351 is unlocked only when you understand how to configure it correctly. This brings us to the critical search query: Vertex VX351 programming software work.
If you have ever stared at a blinking cursor, tried to connect a cable, or received an ominous "Communication Error" message, this guide is for you. We will dissect what the software is, how it functions, the step-by-step workflow, common pitfalls, and how to ensure your radios are programmed for optimal performance.
The Legal and Practical Reality
Before you start programming, understand this: You must have a license to transmit on most business bands. The software allows you to enter any frequency, but transmitting on police, fire, or aircraft frequencies is illegal.
The software is intended for:
- Licensed business itinerant frequencies (e.g., 464.500 MHz).
- MURS (VHF only – 151-154 MHz) – No license required in the US.
- Amateur radio bands (if you hold an FCC Ham license).
Step 6: The "Write" Function (Saving your work)
- Click Radio > Write to Radio.
- The radio screen may flicker or dash. Do not touch the cable.
- Wait for "Operation Complete." Turn the radio off and on. Your changes are now live.
4. Typical Programming Workflow
- Backup original codeplug – Save as
.vxd or .dat (e.g., original_backup.vxd).
- Edit channels (Conventional mode only – no trunking):
- RX Frequency / TX Frequency (136–174 MHz, depending on band split).
- QT/DQT (Encode/Decode) – Select CTCSS or DCS codes for privacy.
- TX Power – High (5W) or Low (1W).
- Channel Spacing – 12.5 kHz (narrow) or 25 kHz (wide, if legally permitted).
- Set optional features (via Common or Optional Features tab):
- Compander – Noise reduction.
- Busy Channel Lockout (BCLO) – Prevent transmitting on an active channel.
- Time-out Timer (TOT) – e.g., 60 seconds.
- Write to radio – Click Write (F5) ; keep radio powered on and cable secure.
Part 4: Common Error Codes & Fixes
| Error Message | Likely Cause | Solution |
| :--- | :--- | :--- |
| “Model Mismatch” | You are using CE60 or the wrong DLL. | Reinstall CE115. Ensure the radio is a true VX-351 (not a VX-351A or VX-354). |
| “Time Out” / “No Response” | Driver issue or wrong COM port. | Go to Device Manager. Change the USB Serial Port’s Latency Timer to 1 ms (Advanced tab). |
| “Checksum Error” | Corrupted codeplug or bad cable connection. | Jiggle the round connector. If persistent, you need a "Codeplug recovery" (requires dealer software). |
| Radio shows “Err” after write | You tried to program an out-of-band frequency. | The VX-351 comes in two splits: 136-174 MHz (VHF) and 403-470 MHz (UHF). Stay within those ranges. |
5. Common Errors & Solutions
| Error Message | Likely Cause | Solution |
|---------------|--------------|----------|
| "Model Mismatch" | Wrong firmware or radio model selected | Re-select VX-351; check radio’s sticker |
| "Check Connections" | Radio off, wrong COM port, or driver issue | Verify COM; try restarting radio/PC |
| "Out of Band" | Frequency outside radio’s band split | VX-351 has 2 variants: low (136–160) or high (150–174) |
| "Codeplug too new/old" | CPS version incompatible with radio firmware | Use CPS version matching radio’s firmware age (don’t mix v1.0 with v2.0) |
| PTT not working after write | Channel programmed with RX only (e.g., receive-only frequency) | Ensure TX frequency is entered for duplex channels |
Conclusion: Making the Vertex VX351 Programming Software Work for Your Business
The Vertex VX-351 is a rock-solid device, but it is a blank slate without proper configuration. Understanding how the Vertex VX351 programming software works transforms these radios from expensive paperweights into a coordinated communication network.
Recap of success:
- Hardware: Good battery + correct USB-to-TTL cable.
- Driver: Legacy Prolific driver (v3.2.0.0) on the correct COM port.
- Software: CE115 running in Admin mode.
- Workflow: Read → Backup → Edit → Write.
- Troubleshooting: Port errors cause 99% of failures.
If you follow the steps outlined above, you will avoid the dreaded "Connect Fail" message. You will be able to clone radios across your entire security team, change frequencies for an event in ten minutes, and ensure every channel has the correct squelch tone.
The software is just a tool; the workflow is the skill. Now you know how to make the Vertex VX351 programming software work for you.
Disclaimer: Programming two-way radios requires technical knowledge of radio frequencies and local laws. Always verify your frequency permissions before transmitting.
To get your Vertex VX-351 radio programmed and working, you need three specific components: the correct software, a compatible programming cable, and the appropriate USB drivers. 1. The Software (CE86) The Vertex Standard VX-351 series uses the CE86 Programming Software Version Compatibility
: Ensure you are using a version compatible with your operating system (most versions work on Windows 7 through 10, though you may need "Compatibility Mode" for newer systems).
: This software allows you to assign frequencies to the 16 channels, set CTCSS/DCS tones (to block out other users), and configure the side buttons for functions like "Monitor" or "Scan." 2. The Programming Cable
You cannot use a standard USB cable. You need a cable with a 4-pole 3.5mm jack (often referred to as a "Vertex/Yaesu" style cable). OEM vs. Aftermarket : Original Vertex cables (like the
) are most reliable, but many users successfully use generic USB-to-3.5mm cables found on Amazon or eBay. The Connection
: The cable plugs into the single accessory/mic jack on the side of the radio. 3. Driver Installation
The most common reason the software "won't work" is a driver mismatch. Prolific/FTDI Drivers vertex vx351 programming software work
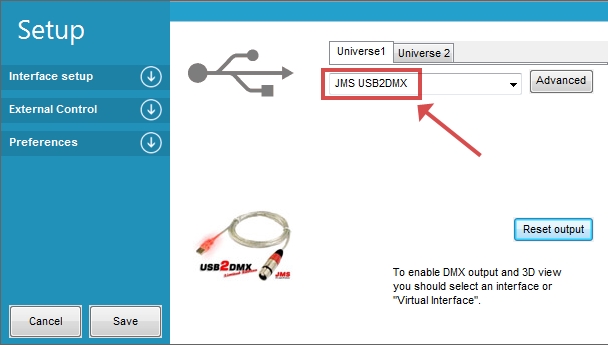
: Most cables use Prolific or FTDI chips. If your computer doesn't recognize the cable, you likely need to manually install the driver. COM Port Selection : Once the cable is plugged in, check your Windows Device Manager
to see which COM Port (e.g., COM3) was assigned. You must match this port number in the CE86 software settings under Basic Troubleshooting
If you receive a "Communication Error" or "Radio Not Found" message: Check the Connection : Ensure the 3.5mm jack is pushed all the way
into the radio. Sometimes the radio's casing or a dust cover prevents a tight fit. : The radio must be turned before you click "Read" or "Write" in the software. Run as Administrator
: Right-click the CE86 icon and select "Run as Administrator" to ensure it has permission to access your USB ports. To help you further, do you already have the CE86 software installed , or are you looking for a download link/source
Configuring Vertex VX351 with Programming Software: A Step-by-Step Guide
The Vertex VX351 is a popular two-way radio communication device used by professionals and enthusiasts alike. To unlock its full potential, users need to configure it using the Vertex VX351 programming software. In this story, we'll follow John, a radio technician, as he works with the software to program a VX351 radio.
The Job
John had just received a call from a local construction company, requesting his services to program a fleet of Vertex VX351 radios. The company needed to configure the radios to work on a specific frequency and with certain features enabled. John arrived at the construction site with his laptop, programming cable, and software.
The Software
The Vertex VX351 programming software, also known as the "VX351 Programmer," was a Windows-based application. John had used it before, but he still needed to review the manual to ensure he was up to date with the latest features and procedures. He launched the software on his laptop and connected the VX351 radio to the computer using a programming cable.
Step 1: Reading the Radio's Configuration
The first step was to read the radio's current configuration. John clicked on the "Read" button in the software, and the program sent a request to the radio. The radio responded by transmitting its current configuration, which the software displayed on the screen. John reviewed the configuration to understand the radio's current settings.
Step 2: Configuring the Frequency
The construction company needed the radios to work on a specific frequency, 450.0125 MHz. John navigated to the "Frequency" tab in the software and entered the desired frequency. He also set the modulation type to "FM" and the bandwidth to "25 kHz," as required by the company.
Step 3: Enabling Features
The company wanted to enable certain features on the radios, such as tone squelching and selective calling. John navigated to the "Features" tab and checked the boxes next to the desired features. He also programmed the tone frequencies and selective calling IDs. Mastering the Vertex VX-351: A Comprehensive Guide to
Step 4: Configuring the Scan List
The company needed to configure a scan list to allow users to scan multiple channels. John created a new scan list and added the desired channels. He also set the scan mode to "Priority" and the priority channel to the company's main channel.
Step 5: Writing the Configuration to the Radio
Once John had completed all the necessary changes, he clicked on the "Write" button to transmit the new configuration to the radio. The software verified that the configuration was written successfully, and John tested the radio to ensure it was working as expected.
The Result
After programming the VX351 radio, John tested it to ensure it was working correctly. The radio communicated with the company's base station, and the features he had enabled worked as expected. The construction company was satisfied with the configuration, and John had successfully used the Vertex VX351 programming software to get the job done.
Conclusion
Programming the Vertex VX351 radio with the VX351 programming software required attention to detail and a good understanding of the software and radio features. John had successfully configured the radio to meet the construction company's needs, demonstrating the importance of proper configuration and testing to ensure reliable communication. With the right tools and expertise, technicians like John can help users get the most out of their two-way radios.
To program the Vertex Standard VX-351, you primarily need the CE86 programming software . This software allows you to configure frequencies, privacy codes (CTCSS/DCS), and programmable key functions . 1. Required Hardware & Software
Software: CE86 Programming Software (compatible with Windows 2000 through Windows 10) .
Cables: A combination of the FIF-12 (USB interface box) and the CT-106 (DIN to 3.5mm pigtail cable) .
Drivers: Ensure the FIF-12 drivers are installed so the computer recognizes the USB interface . 2. Setup and Connection Programming Basics for the Vertex VX-350
The Vertex Standard VX-351 is a rugged, 16-channel analog two-way radio widely used in industrial and public safety sectors. Proper programming is essential for customizing its features, such as frequency assignments, signaling, and programmable key functions. Core Software Requirements
To program the VX-351, you primarily use the Vertex Standard CE-86 programming software. This software allows for comprehensive configuration of the radio's operating parameters:
Channel Management: Setting specific frequencies (VHF 134–174 MHz or UHF 400–520 MHz) and channel spacing (12.5/20/25 kHz).
Signaling: Configuring CTCSS/DCS encode/decode, 2-tone, and 5-tone signaling for selective calling.
Key Customization: Assigning functions to the radio's two programmable side keys, such as Scan, Monitor, or Talk Around. Hardware and Setup Licensed business itinerant frequencies (e
Successful programming requires a specific hardware interface:
Interface Cable: The FIF-12 USB Interface (which replaces the older FIF-10) is the standard connection between the PC and the radio.
Pigtail Adapter: A CT-106 DIN-to-3.5mm jack cable is required to connect the FIF-12 interface box to the radio's accessory jack.
OS Compatibility: The software is designed for legacy Windows environments, including Windows XP, Vista, and 7. Programming Procedure
The process begins with installing both the CE-86 software and the FIF-12 drivers. Key steps include:
The Vertex VX-351 is a workhorse in the land mobile radio world, known for its ruggedness and reliability. However, its performance is entirely dependent on its configuration via the CE86 Programming Software. Understanding how this software works is essential for anyone looking to manage a fleet of these radios effectively. The Software Core: CE86
The VX-351 doesn't have a screen or a keypad for manual entry, making the CE86 software the only gateway to its settings. This Windows-based utility allows users to define the radio’s behavior, from basic frequency assignments to advanced signaling features. Key Programming Functions
Frequency and Channel Management: The primary use of the software is to assign frequencies to the 16 available channels. This includes setting the transmit and receive frequencies, as well as CTCSS/DCS (Privacy Tones) to filter out unwanted interference from other groups on the same channel.
Button Customization: The VX-351 features two programmable side buttons. Through the software, users can map these to specific functions like "Monitor," "Scan," "Talk Around," or "High/Low Power" to suit their specific workflow.
Signaling and Security: The software manages 2-Tone and 5-Tone paging systems, which are vital for dispatch environments. It also handles the "Stun/Kill/Revive" features, allowing a lost or stolen radio to be disabled remotely over the air.
Battery and Power Optimization: To extend field life, the CE86 software allows for "Battery Saver" settings and the adjustment of "Time-Out Timers" (TOT), which prevent a stuck microphone from jamming a channel indefinitely. The Connection Process
Programming requires a specific hardware bridge: a USB-to-Serial programming cable (typically the CT-106 or a compatible equivalent). The process follows a standard "Read-Edit-Write" workflow:
Read: The software pulls the current data from the radio to ensure compatibility.
Edit: The user modifies frequencies or settings within the interface.
Write: The new "codeplug" is uploaded back to the radio, instantly updating its logic. Conclusion
The Vertex VX-351 programming software is more than just a setup tool; it is the "brain" of the device. By mastering the CE86 environment, users can transform a simple walkie-talkie into a sophisticated communication tool tailored for construction sites, security teams, or industrial plants. Without it, the radio remains a locked box; with it, it becomes a versatile asset in any professional toolkit.