Manual: Controle Universal Articco Th-msur-40
Manual: Controle Universal Articco Th-msur-40
Mastering Your Multi-Device Ecosystem: The Complete Guide to the Manual Controle Universal Articco TH-MSUR-40
In an era where the average household owns at least four remote controls (TV, soundbar, satellite box, streaming stick), clutter and confusion are inevitable. Enter the Articco TH-MSUR-40, a budget-friendly yet surprisingly versatile universal remote control designed to consolidate your command center. However, like many generic replacement remotes, success depends entirely on understanding its manual controle universal articco th-msur-40—the specific button sequences, programming modes, and code lists that bring the device to life.
This comprehensive guide will walk you through every aspect of the Articco TH-MSUR-40. Whether you lost your original remote, need to program a new TV, or are troubleshooting sync issues, this article serves as your definitive resource. manual controle universal articco th-msur-40
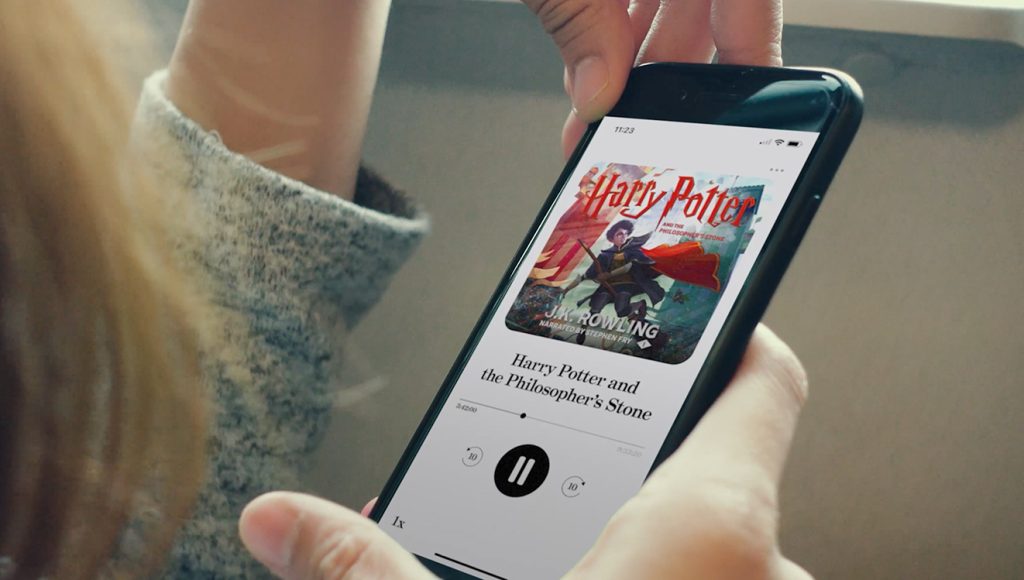
Funcionamento e programação
- Inserção de pilhas e verificação do LED indicador.
- Programação por código: o usuário consulta o manual para encontrar o código correspondente à marca do aparelho, posiciona o controle frente ao equipamento e insere o código seguindo os passos (pressionar e segurar tecla específica, inserir dígitos, testar).
- Modo de aprendizado (se disponível): posicionar o controle original e o TH-MSUR-40 frente a frente, ativar o modo learning, pressionar a tecla no controle original e gravar a função no controle universal.
- Testes e ajustes: provar funções principais (ligar/desligar, volume, troca de canal). Se alguma função não funcionar, repetir a procura de códigos alternativos ou regravar via learning.
1. Core Manual Adjustment Axes
The mount features three primary points of manual articulation, allowing installers to fine-tune the camera’s line of sight without tools (in most cases) after initial setup. Mastering Your Multi-Device Ecosystem: The Complete Guide to
| Adjustment Axis | Movement Range | Manual Control Method |
| :--- | :--- | :--- |
| Pan (Horizontal Rotation) | 360° continuous | Loosen side locking screw; rotate base plate freely. |
| Tilt (Vertical Angle) | 0° to 90° (or 180°, depending on model variant) | Loosen friction hinge knob; angle the camera pendant. |
| Horizontal Leveling | ±5° to ±10° corrective tilt | Rotate the inner gimbal ball joint (if present) or use shims. | Inserção de pilhas e verificação do LED indicador
Problem 3: After programming a soundbar on AUX, the TV volume stops working.
Solution: The Articco TH-MSUR-40 is a mode-based remote. You must press the TV button before pressing VOL +/- to control the TV, or press AUX to control the soundbar. The remote does not automatically switch.
Introdução
O controle remoto universal ARCTICCO TH-MSUR-40 é projetado para substituir múltiplos controles remotos originais, oferecendo compatibilidade ampla e operação simplificada de aparelhos eletrônicos domésticos. Este ensaio aborda sua finalidade, características técnicas, funcionamento, programação, vantagens, limitações e recomendações de uso.
Limitações e problemas comuns
- Nem todas as funções avançadas (menus específicos, aplicativos de smart TV) podem ser mapeadas, resultando em acesso limitado a recursos proprietários.
- Processo de programação pode ser confuso para usuários não técnicos; manuais mal traduzidos/ilustrados agravam o problema.
- Alcance e precisão do sinal infravermelho dependem do alinhamento e podem ser inferiores ao controle original.
- Falhas ocasionais na detecção de códigos ou perda de programação quando as pilhas estão fracas.
Boas práticas de uso
- Manter o manual ou uma lista dos códigos usados em local acessível.
- Usar pilhas novas e de boa qualidade; substituir quando o alcance diminuir.
- Ao programar via learning, garantir ambiente sem luz solar direta que possa interferir no sensor IR.
- Testar sempre várias funções após programação e tentar códigos alternativos se algo falhar.
2. Step-by-Step Manual Positioning Procedure
- Secure the base – Screw the mount’s ceiling plate into a structural joist (using included lag bolts). Do not over-tighten.
- Route cables – Pass the camera’s ethernet/power/video cable through the mount’s central hole and out the side channel.
- Attach the camera – Screw the camera onto the 1/4”-20 or 3/8”-16 thread stud (standard for most security cameras). Use the included anti-rotation tooth washer.
- Loosen all locking mechanisms – Unfasten the pan screw and tilt knob until each joint moves freely but not loosely.
- Set rough aim – Point the camera toward the general area of interest (e.g., a doorway or parking lot).
- Monitor video feed – While watching a live view on a monitor or app:
- Adjust pan to center the horizon horizontally.
- Adjust tilt to frame the desired vertical coverage (e.g., 30° downward for facial capture).
- Fine-tune leveling to ensure straight edges (walls, door frames) are not tilted.
- Lock progressively – Tighten the tilt knob first, then the pan screw. Re-check alignment; friction hinges can slightly shift when locked.
- Conceal cables – Push excess wire into the mount’s cable management cavity and snap on the decorative cover (if included).