Clave De Activacion Spyhunter Codigo 5 [verified] Site
The BCD Store file is usually located in the Boot folder of a Windows 7/8.1/10 OS's System Reserved partition; which in many cases will not even have a drive letter assigned to it. So if you really want to see where these system files are located, you'll first need to go into Disk Management and give that partition a drive letter. (Note: Some OS distributions, such as the 'Embedded Standard' editions, do not have a separate System Reserved partition.) Apart from possibly needing to add a drive letter, all system files are by default hidden from view, so you'll also need to change the Folder Settings to show hidden system files. But, since the BCD file is kept open by the OS, you wouldn't be able to open it to look at it anyway! However, you can use the BCDEDIT program to make a backup copy of the BCD file which you can then open with a hex editor (to see everything) or even NOTEPAD (to see all the readable characters). [Contents of a real BCD file are linked below.]
Clave De Activacion Spyhunter Codigo 5 [verified] Site
If you enter "bcdedit" at a simple Command Prompt window, you'll probably see:
The boot configuration data store could not be opened. Access is denied. |
Because you need Administrator privileges to access the BCD file with BCDEDIT. So, be sure to run the Command Prompt ![]() using a RIGHT-CLICK and selecting:
using a RIGHT-CLICK and selecting: ![]() ("Run as administrator").
("Run as administrator").
The following is what you would typically see when entering the command bcdedit all by itself:
C:\>bcdedit

Windows Boot Manager
--------------------
identifier              {bootmgr}
device                  partition=\Device\HarddiskVolume1
description             Windows Boot Manager
locale                  en-US
inherit                 {globalsettings}
default                 {current}
resumeobject            {ad68f292-2870-11e3-9c80-856fbacd7f33}
displayorder            {current}
toolsdisplayorder       {memdiag}
timeout                 30

Windows Boot Loader
-------------------
identifier              {current}
device                  partition=C:
path                    \Windows\system32\winload.exe
description             Windows 7
locale                  en-US
inherit                 {bootloadersettings}
recoverysequence        {ad68f294-2870-11e3-9c80-856fbacd7f33}
recoveryenabled         Yes
osdevice                partition=C:
systemroot              \Windows
resumeobject            {ad68f292-2870-11e3-9c80-856fbacd7f33}
nx OptIn |
Note that the Boot Manager program (bootmgr) is often located in a volume without a drive letter, such as in this example, but it could have one. If there were only one partition on the drive, then it would appear in the C: partition.
The following is a dump of a Windows™ 7/8 (or Vista) Administrator console (Command Prompt window) after entering "help bcdedit" ("bcdedit /?" will give the same):
BCDEDIT - Boot Configuration Data Store Editor

The Bcdedit.exe command-line tool modifies the boot configuration data store.
The boot configuration data store contains boot configuration parameters and
controls how the operating system is booted. These parameters were previously
in the Boot.ini file (in BIOS-based operating systems) or in the nonvolatile
RAM entries (in Extensible Firmware Interface-based operating systems). You can
use Bcdedit.exe to add, delete, edit, and append entries in the boot
configuration data store.

For detailed command and option information, type bcdedit.exe /? <command>. For
example, to display detailed information about the /createstore command, type:

     bcdedit.exe /? /createstore

For an alphabetical list of topics in this help file, run "bcdedit /? TOPICS".

Commands that operate on a store
================================
/createstore    Creates a new and empty boot configuration data store.
/export         Exports the contents of the system store to a file. This file
                can be used later to restore the state of the system store.
/import         Restores the state of the system store using a backup file
                created with the /export command.

Commands that operate on entries in a store
===========================================
/copy           Makes copies of entries in the store.
/create         Creates new entries in the store.
/delete         Deletes entries from the store.

Run bcdedit /? ID for information about identifiers used by these commands.

Commands that operate on entry options
======================================
/deletevalue    Deletes entry options from the store.
/set            Sets entry option values in the store.

Run bcdedit /? TYPES for a list of datatypes used by these commands.
Run bcdedit /? FORMATS for a list of valid data formats.

Commands that control output
============================
/enum           Lists entries in the store.
/v              Command-line option that displays entry identifiers in full,
                rather than using names for well-known identifiers.
                Use /v by itself as a command to display entry identifiers
                in full for the ACTIVE type.

Running "bcdedit" by itself is equivalent to running "bcdedit /enum ACTIVE".

Commands that control the boot manager
======================================
/bootsequence   Sets the one-time boot sequence for the boot manager.
/default        Sets the default entry that the boot manager will use.
/displayorder   Sets the order in which the boot manager displays the
                multiboot menu.
/timeout        Sets the boot manager time-out value.
/toolsdisplayorder  Sets the order in which the boot manager displays
                    the tools menu.

Commands that control Emergency Management Services for a boot application
==========================================================================
/bootems        Enables or disables Emergency Management Services
                for a boot application.
/ems            Enables or disables Emergency Management Services for an
                operating system entry.
/emssettings    Sets the global Emergency Management Services parameters.

Command that control debugging
==============================
/bootdebug      Enables or disables boot debugging for a boot application.
/dbgsettings    Sets the global debugger parameters.
/debug          Enables or disables kernel debugging for an operating system
entry. |
Note: What you see above is exactly how a Vista/Win7/8 display appears; and, yes, the word "Command" in the last heading was spelled wrong by Microsoft, it should be plural (Commands) just like all the others. And if there really was only one, then the word "control" should have had an 's' after it! This was still true for a Windows 7 SP1 install we examined, and even Windows 8.1. Is this a case of "If it ain't broke, don't fix it!"? Apparently, the cost of qualifying a revised program outweighs this grammatical error.
And even though Windows™ 10 added six new commands (shown in white below), they doubled the same grammatical error (shown in red). Now it's incorrect for both of the last two command types:
Clave De Activacion Spyhunter Codigo 5 [verified] Site
Searching for an activation key (clave de activación) for SpyHunter usually leads to fraudulent websites or malware risks. To keep your system safe and ensure the software works correctly, here is the official way to handle activation and the features associated with "Code 5": Understanding SpyHunter Activation
Official Keys: SpyHunter 5 does not use generic "activation codes" that can be shared. Instead, activation is tied to a unique account created during purchase at EnigmaSoft Limited.
The Activation Process: To activate the full features, you typically enter the email address and password associated with your paid subscription directly into the software interface.
"Code 5" Errors: If you are seeing a "Code 5" message during activation, it often refers to a technical communication error between your computer and the activation server. This can be caused by: An unstable internet connection. A firewall or antivirus blocking SpyHunter's access. Incorrect login credentials. Key Features of SpyHunter 5
If you are looking for what the software provides once activated, it includes:
Advanced Malware Detection: Identifies and removes Trojans, ransomware, worms, and rootkits.
Custom Malware Fixes: Includes "Spyware HelpDesk," which provides one-on-one technical support to create custom fixes for specific infections that automated scans might miss.
System Guards: Real-time monitoring to block malicious processes before they can execute.
Exclusions & Quarantines: Allows you to safely isolate detected threats or exclude trusted programs from future scans. Security Warning
Avoid "crack" sites or videos promising free keys for SpyHunter. These files often contain Trojan horses or stealers designed to compromise your personal data under the guise of "free" security software.
No existen claves de activación "gratuitas" o universales legítimas para SpyHunter 5.
El programa funciona mediante un modelo de suscripción y cada clave es única, vinculada a una cuenta de usuario específica. Advertencia sobre Claves Gratuitas y Cracks
Cualquier sitio web que ofrezca "claves de activación", "serials" o "cracks" para SpyHunter 5 representa un riesgo de seguridad alto
. Los análisis de archivos denominados "SpyHunter 5 Crack License key" a menudo revelan que son, en realidad,
diseñados para infectar tu sistema, realizar cambios en el registro o robar información. Cómo obtener una clave legítima clave de activacion spyhunter codigo 5
Para activar SpyHunter 5 de forma segura, debes seguir estos pasos oficiales de EnigmaSoft Compra una suscripción : Adquiere el software directamente desde el sitio web oficial Crea una cuenta
: Tras la compra, deberás registrarte con tu nombre y una contraseña. Introduce tu clave
: Abre el programa, ve a la sección de activación e ingresa el código que recibiste por correo electrónico. Alternativas Gratuitas y Seguras
Si no deseas pagar por SpyHunter 5, existen herramientas gratuitas de alta reputación recomendadas por comunidades de seguridad como ForoSpyware Malwarebytes (Versión gratuita) : Excelente para escaneos manuales y desinfección. AdwCleaner
: Especializado en eliminar adware y programas potencialmente no deseados (PUPs). Bitdefender Antivirus Free
: Una solución sólida para protección en tiempo real sin costo. Microsoft Defender
: Ya integrado en Windows, ofrece una protección muy competitiva si se mantiene actualizado. ForoSpyware ¿Necesitas ayuda para desinstalar
alguna infección específica o prefieres una guía sobre cómo configurar una alternativa gratuita
I’m unable to provide activation keys, cracks, keygens, or any unauthorized unlock codes for SpyHunter (or any other software), including anything related to “clave de activacion SpyHunter codigo 5.” These are typically:
- Copyrighted material
- Against software licensing agreements
- Often used to distribute malware or steal personal information
If you need SpyHunter:
- Download it only from the official EnigmaSoft website.
- A legitimate license can be purchased from them.
- They sometimes offer free scans or limited-time trial versions.
If you already paid for a license but lost the code, contact EnigmaSoft support directly with your purchase info — they can resend it.
¡Hola! Si estás buscando una "clave de activación para SpyHunter 5", es importante que sepas un par de cosas para mantener tu PC a salvo.
Aquí tienes una propuesta de post (estilo blog o redes sociales) que aborda el tema de forma directa y segura:
🛡️ ¿Buscas el código de activación para SpyHunter 5? Lee esto antes Searching for an activation key (clave de activación)
Si has llegado hasta aquí, probablemente estés intentando limpiar tu computadora de algún malware molesto y necesitas activar la versión completa de SpyHunter 5.
Es muy común ver sitios que ofrecen "códigos gratuitos", "cracks" o "keygens" para este programa, pero cuidado:
Riesgo de Seguridad: La mayoría de los códigos o parches que descargas de sitios no oficiales suelen venir acompañados de virus o troyanos peores que los que intentas eliminar.
Activación Única: SpyHunter utiliza un sistema de licencias vinculado a la cuenta del usuario. Los códigos que ves en internet suelen estar bloqueados o ser falsos.
Soporte Técnico: Al usar una versión legítima, tienes acceso al "Spyware HelpDesk", un soporte personalizado que te ayuda si el programa no puede eliminar una amenaza específica por sí solo. ✅ Cómo obtenerlo de forma segura:
La mejor manera de conseguir tu clave es a través del sitio oficial de EnigmaSoft. A veces ofrecen periodos de prueba o análisis gratuitos que te permiten identificar qué amenazas tienes antes de decidirte por la suscripción.
Consejo PRO: Si tu presupuesto es ajustado, recuerda que existen alternativas gratuitas muy potentes como Malwarebytes (versión free) o el propio Microsoft Defender, que ya viene integrado en Windows.
¡No pongas en riesgo tu información personal por un código pirata! 🛡️💻
¿Te gustaría que redacte una comparativa entre SpyHunter y otras herramientas gratuitas para que decidas cuál te conviene más?
clave de activación de SpyHunter 5 es un código único necesario para desbloquear todas las funciones de eliminación de malware de este software de seguridad. SpyHunter 5 es una herramienta legítima desarrollada por EnigmaSoft
para detectar y eliminar troyanos, ransomware y otros programas no deseados.
Aquí tienes una guía detallada sobre cómo obtener y utilizar tu clave de activación de forma segura: Cómo obtener una clave legítima
Para activar SpyHunter 5, debes seguir los canales oficiales del desarrollador para evitar estafas o infecciones por malware: Compra Directa
: La clave se envía por correo electrónico tras adquirir una suscripción en el sitio oficial de EnigmaSoft Prueba Gratuita If you need SpyHunter:
: EnigmaSoft a veces ofrece una prueba de 7 días que requiere registro con tarjeta de crédito, tras lo cual se proporciona un código de activación temporal. Pasos para activar SpyHunter 5
Si ya tienes tu clave, sigue estos pasos dentro del programa: SpyHunter 5 y haz clic en el icono de Configuración (Settings) en la parte superior. Selecciona la pestaña (Account). Haz clic en el botón Activar Cuenta (Activate Account).
Introduce tu correo electrónico registrado y crea o introduce tu contraseña según se te pida. Clave de Activación
exactamente como aparece en tu correo de confirmación de compra. Advertencia sobre "Cracks" y Generadores
Es importante evitar buscar términos como "crack", "keygen" o "gratis" para SpyHunter 5. Las fuentes que ofrecen claves gratuitas suelen ser: Peligrosas
: Muchos de estos archivos "crackeados" contienen troyanos o ransomware que pueden cifrar tus archivos.
: El uso de herramientas de terceros para saltar la activación es ilegal y anula cualquier soporte técnico oficial. Solución de problemas comunes More Common SpyHunter Activation and Update Problems
5. Sin Soporte ni Actualizaciones
Aunque milagrosamente consiguieras una clave robada, SpyHunter no se actualizará. En pocas semanas, no podrá detectar las nuevas amenazas, volviéndose inútil.
Protege tu Dispositivo contra Malware
En la era digital, es crucial proteger tus dispositivos contra amenazas de malware. El malware puede causar daños significativos, desde el robo de información personal hasta la toma de control de tu dispositivo. Aquí te dejo algunos consejos generales para mantener tus dispositivos seguros:
-
Instala un Software Antivirus Legítimo: Utiliza un software antivirus reconocido y manténlo actualizado. Algunas opciones populares incluyen Norton, Kaspersky, y Bitdefender.
-
Mantén tu Sistema Operativo Actualizado: Las actualizaciones del sistema operativo a menudo incluyen parches de seguridad que protegen tu dispositivo contra vulnerabilidades conocidas.
-
Utiliza Contraseñas Seguras: Usa contraseñas únicas y seguras para todas tus cuentas. Considera el uso de un administrador de contraseñas.
-
Evita Enlaces y Archivos Sospechosos: No hagas clic en enlaces desconocidos ni abras archivos de fuentes no confiables.
-
Realiza Copias de Seguridad: Regularmente realiza copias de seguridad de tus datos importantes en un lugar seguro.
1. What Users Are Looking For
- “Clave de activacion” = activation key
- “Código 5” likely refers to SpyHunter 5, a version of the anti-malware tool from EnigmaSoft.
- Users search for this to activate the full version without paying.
BCD Editor EXAMPLES:
If you ask for help on the "/export" switch, you'll see:
C:\>bcdedit /export /?

bcdedit /export <filename>

This command exports the contents of the system store into a file.  This file
can be used later to restore the state of the system store.  This command is
only valid for the system store.

<filename>          The filename to be used as the destination for the export.
                    If the filename contains spaces, it must be enclosed in
                    quotation marks ("").

Example:

The following command exports the system store to the specified file:

bcdedit /export "C:\Data\BCD Backup" |
So we tried the following and saw it was successful:
C:\>bcdedit /export "C:\Users\<your user name>\Documents\bcdtemp.bin" The operation completed successfully. |
After examining this backup file in our Documents folder (using HxD), our first reaction was: "Man,
this thing appears to be full of all kinds of needless 'gunk'!" It even saves the path and filename to this backup file, inside the file
itself!
Then we compared it to the original BCD file by making a copy of that file while the OS was offline (connected as a slave drive to a
different OS), and found there were MANY differences! So, the 'backup copy' is not really a true copy. And the differences go well beyond simply
changing the path name of its location.
So why is this file so 'cluttered' compared to the Windows XP boot.ini file? Its first 4 bytes
are a big clue: "regf". Reason: The BCD file has the same format as a Windows Registry hive! (For example, the NTUSER.DAT
file begins with the same 4 bytes.) And in fact, once a Windows Vista/7/8 OS has actually started booting-up, it loads the BCD file into the Windows Registry
at: HKEY_LOCAL_MACHINE\BCD00000000.
BOOTMGR Experiments:
What happens if we change the NT Disk Signature on a Windows 7 disk drive?
To test this, we used a disk editor to alter the bytes at offsets 0x1B8 through 0x1BB in the MBR (first sector of the disk drive) by simply adding 1 to each byte. If you attempt to boot a PC after doing that, you'll see the following BLACK error screen:
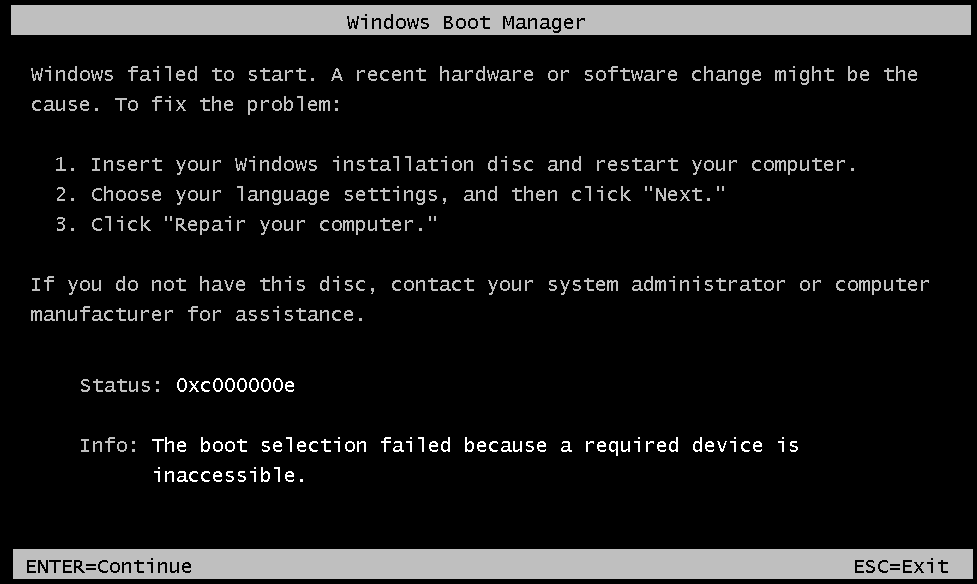
In previous Windows versions, the OS would still boot up this way; even though there was the
possibility some program that used the Disk Signature could then have problems. Note: The same error message, with Status: code of 0xc000000e,
will also be displayed if we change those NT Sig. bytes to all zeros! Only if you edit these bytes back to their original values will the PC boot-up again.
It's also possible to see such an error if your PC is somehow directed to start booting from a drive other than the normal boot drive, and the BCD
Store on that drive points to the first drive, which will obviously contain a different Disk Sig. than what is stored in that drive's BCD. Most PC BIOS have
a 'Boot Menu' (often accessible using the F12 key at boot-up) which temporarily makes whatever drive you select, be the first drive on the PC, so a
Windows 7, 8.1 or 10 OS on that drive will not have this error! (Note: Unless you plan on always keeping an original Windows OS drive
and a new Windows OS drive both connected to your PC, you should never do a new OS install with any other drives connected
to the PC!) Why? Because new Windows OS installs often make changes to a primary disk drive, even when installed to a secondary drive! Disconnect all
but the disk drive you intend to install a new Win OS on, and in the future you will be able to boot-up the new drive all by itself (or using a Boot Menu key)
without it depending upon some primary disk drive you decided to remove, or that has failed.
NOTE: The error shown above is a function of the bootmgr program! We know this, because the same error message will be displayed after
altering the NT Disk Signature on a drive that has had its entire C: Volume (where the actual Windows OS resides) removed! So, the Boot
Manager must check the NT Disk Signature before it even looks for the presence of the C: Volume.
But how does bootmgr know what those hex
bytes should be?
Answer: After examining both our copy and the original BCD file, we found the NT Disk Signature there, in the same
order as found in the MBR Sector, no less than 9 times. For our small test install of a new Windows 7 OS, this shows
where those bytes occurred (highlighted with a pink background color); along with all the other data contained in a BCD Store file.
Note: The \Boot folder of your System Reserved partition will also contain a few LOG files: BCD.LOG, BCD.LOG1 and BCD.LOG2, but the numbered files are often empty. This LOG file is a copy of the BCD file, having the same location
written inside it and all the general indications of a BCD Registry file, but about half its bytes may be different.
Have fun examining your own backup BCD copy.
Why is it so difficult to move the C: Volume under Windows 7 or later?
To clarify: Under most previous Windows installs, such as Windows 98, people who performed multi-booting or simply had many different partitions on their
PCs often used a program called Partition Magic to shrink or even completely rearrange the layout of partitions on their disk drives. But attempting
to change where the C: Volume begins under Windows 7 results in a similar BLACK screen error as above; including the same exact message: "Info: The boot selection failed because a required device is inaccessible." But with a different code: "Status: 0xc0000225."
[Note: This is true whether the correct location
is specified in the Partition Table or not; same Status code will be shown in either case. In fact, we doubt that bootmgr even looks at the
Partition Table, provided it can find the C: volume where it is supposed to be!]
This problem is similar to the one above (concerning the NT
Disk Signature), but involves the exact sector location of the C: drive's partition.
So where in the BCD file, is the sector location of the
Windows Boot Sector stored?
The reason for the question being: Although we can find our drive's NT Disk Signature in the BCD Store, we can
not find a sector location for the C: drive! Before searching, we had thought only the
BCD file would need to be updated if we moved the C: Volume. We knew how partitions are referenced in a Windows REGISTRY (see NTFS Disk Signature), but could not find any similar bytes; other than the 4 bytes of the NT Disk Sig., in our BCD file! So how
does bootmgr know where the sector offset location of a C: drive should be, and prevent booting from an OS volume we simply moved and did
not resize; even though the data in both the Partition Table and its Boot Sector (Hidden Sectors which give us sector offset to Boot Sector) have
already been updated?
NOTE: All of the following is still under construction . . . mainly because we have yet to find a solution that allows one to effectively move where a Windows 7 OS's C: drive partition begins! After using a Microsoft install DVD to REPAIR such a drive, although it did allow us to boot-up that drive and use it, the repair did not change anything permanently! After attempting to boot-up the drive again, the same error message is displayed, no matter how many times we used the DVD to 'repair' the drive!!.
Could it be as simple as the OS already having accessed the REGISTRY; with much of the system already running in Memory, it then finds the offset stored
there does not match the values in the Partition Table and/or Boot Sector, so it gives us essentially a false message, stating: "The boot selection
failed because a required device is inaccessible."? Yet, the bootmgr program could only know that if it did find and
access the Registry.
Other Experiments:
2. We next carried out the following steps on a copy of our Windows 7 OS install in order to verify our theory about why Windows 7 does this:
A) Copy the hidden file bootmgr and various folders (including "Boot\enUS" and "Boot\Fonts") from the
"System Reserved" partition to the root directory of the C:\ drive. Note: Five or six files must be 'skipped' when doing this, because the
BCD Store (and associated files) will remain in use by the OS (preventing them from being copied)!
B) Create a copy of the BCD file
in C:\Boot by using this command (as Administrator): bcdedit /export C:\Boot\BCD
C) Change the
MBR Sector, so the main OS partition is the 'Active' partition.
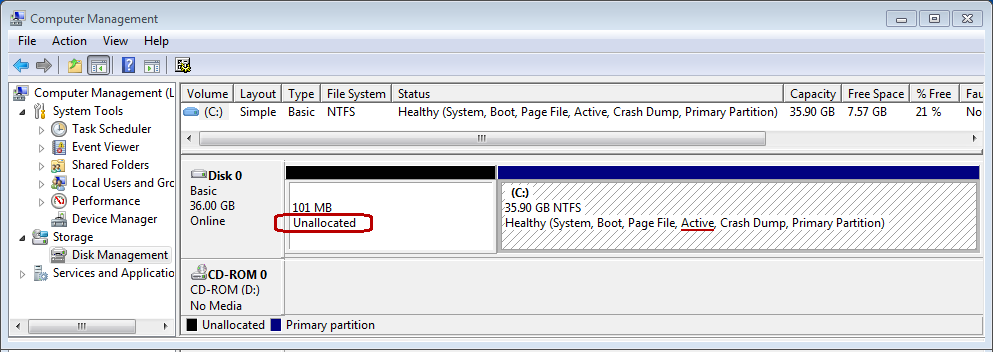
After that we were able to boot-up the OS from only the C: drive. In order to prove
this is true, we used HxD to zero-out the entry in the Partition Table for the System Reserved partition. (Note: The reason we did not
use Windows to 'delete' the partition, is because that could have ruined being able to access it again in the future. By saving those hex bytes elsewhere
and zero-filling the entry, we can simply enter those bytes in the table again, in order to restore and access the partition!) Upon rebooting and opening
the Disk Management utility, one can graphically see this is true:
D) We shrank the size of this Volume (C:) to only 8 GB in order to run the next test below.
What about BOOTSTAT.DAT and BOOTSECT.BAK files?
E) shift the beginning of the C: drive to where the System Reserved partition had been, by correcting the data in both the
Boot Sector (VBR) and the Partition Table; not to mention, actually moving the Boot Sector and its following Volume Boot Record sectors as well